If you are editing footage in Davinci Resolve and are having problems with Davinci reacting slowly and taking ages to change tabs and settings. This article will show you one of the quickest and easiest ways to get a major performance boost in Davinci Resolve especially when you are trying to edit 4K footage. This process works even better when coupled with proxies but they aren’t required.

Table of Contents
Related: Fix Davinci Resolve Error: The code execution cannot proceed because MSVCR120.DLL was not found.
A lot of people are switching from Premiere Pro to Davinci Resolve looking for a better editing and user experience. However making the switch may not seem to make much of a difference, depending on your hardware. Why? Well, Davinci Resolve is more GPU heavy whereas Premiere Pro is more CPU heavy so depending on your device specs you may find one program performs better than others.
If you have Intel Graphics you may also have major performance issues as Davinci isn’t optimised for Intel yet if you are having problems with Intel hardware check out our guide here.
So how do you optimise Davinci Resolve to make editing smoother on a laptop or older PC? While there are quite a few different options including using Proxies for 4K footage the quickest and easiest change anyone can make is to the TImeline Playback Resolution. This will reduce the playback resolution of the footage you are working with giving you a huge performance boost. Especially if you are trying to edit 4K footage. So how do you change the playback resolution in Davinci Resolve?
How do you change the Timeline Playback resolution in Davinci Resolve?
To change the playback resolution of the Timeline in Davinci Resolve do the following.
- First open Davinci Resolve, and a project.
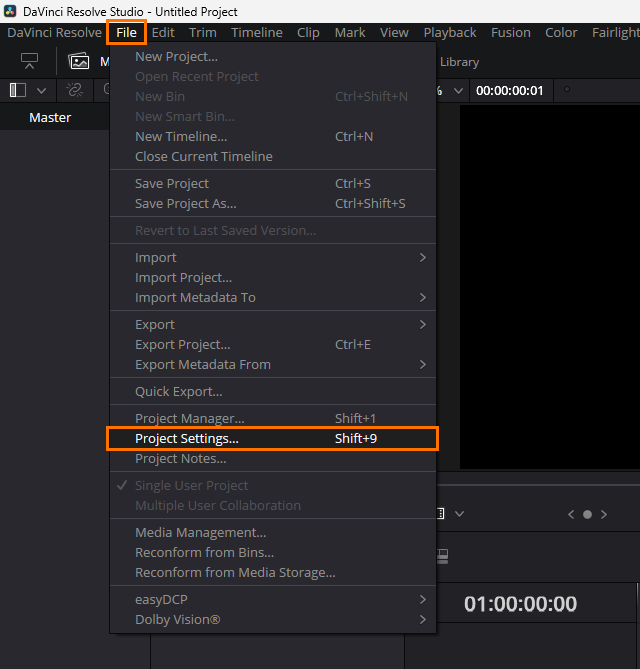
- Once you have a project open go to File > Project Settings.

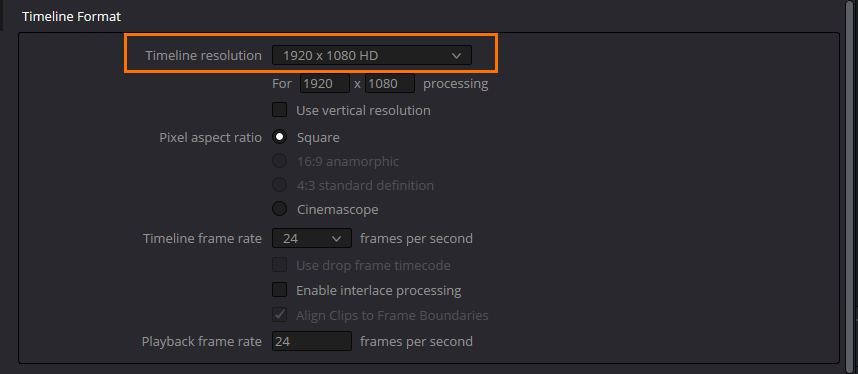
- In the new window that appears use the drop-down box next to Timeline resolution and choose 1920x1080 for horizontal footage or 1080x1920 for landscape footage. You can use even lower resolution if you want to but 1080p should work fine for most modern devices.
- Alternatively, you can also use completely custom timeline resolutions if your project is a completely random resolution.
- After you have made the change click Save at the bottom of the screen to confirm the changes. If you don’t do this and close the window the timeline will revert back to the project's default video resolution.

Now you can edit and create content in Davinci Resolve without your system trying to play 4k content the entire time. Even if you are on a high-end PC this simple change makes a huge difference and will dramatically reduce the hardware usage of your computer as well. If you want an even bigger boost you can look into using proxies to edit 4k footage on your PC. It will make an even bigger difference when using Davinci Resolve but will take a little more time to prepare. If you are having some other problems with Davinci Resolve, make sure you check out the following guides or our full library here.
