SCRCPY is hands down the best tool available for screen mirroring Android devices to Windows PCs. It's free, Super customisable and fairly easy to set up and use. We've tried nearly every tool on the market and nothing comes close to SCRCPY in every single category.

Table of Contents
How to use SCRCPY to Display and control your Android device on Windows
To start the process, you will first have to enable Developer Options on your Android device. If you are unfamiliar with this process, you can follow the steps shown below. The process is similar on most Android devices but if you are having trouble getting it working on yours, search for the process for your specific Android version.
- First, go to Settings on your device.
- Then scroll down and tap on About Phone.
- Next, scroll down and find Software information inside this menu tap the Build Number entry seven times.
- This will trigger a prompt telling you "You are now a developer!"
- Some devices may ask you to enter your passcode. Some might not.
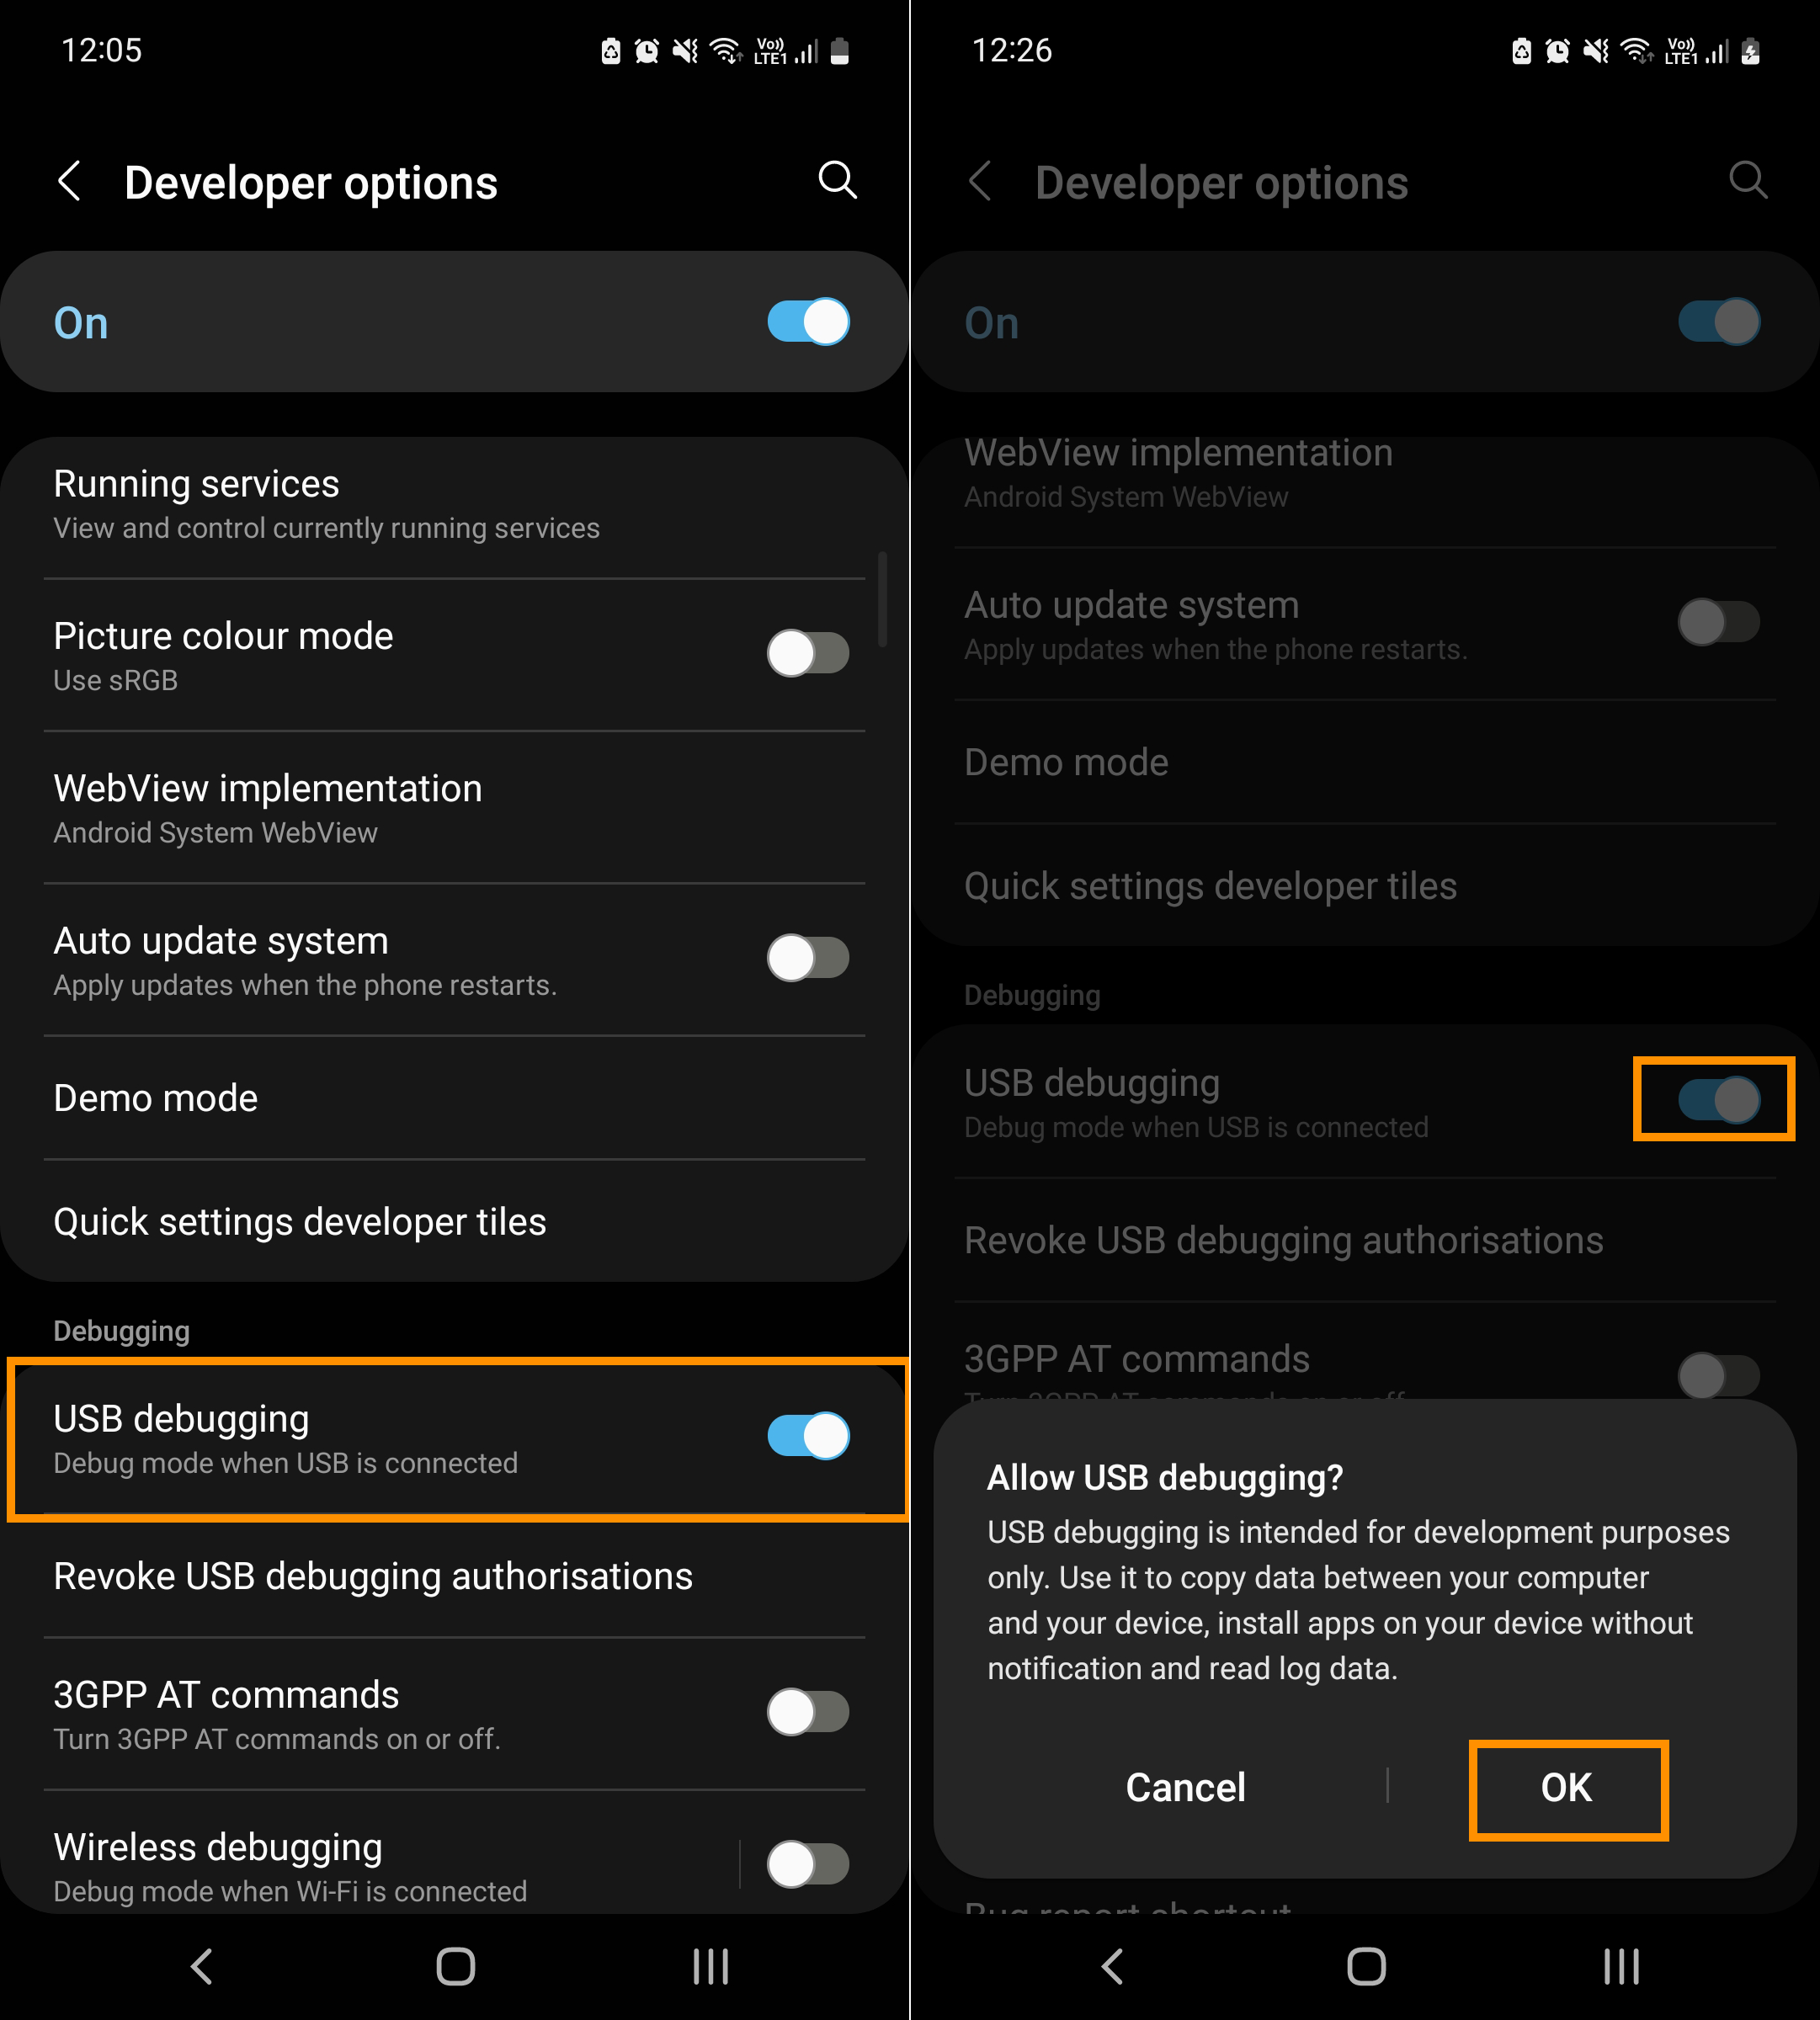
Now that you have Developer Options enabled, you will need to enable USB Debugging.
- To do this go to Settings > Developer Options.
- Inside the Developer Options menu scroll down and make sure USB Debugging is Enabled.
- Accept the confirmation prompt that appears.
Once you have done we can start the next part of the process which is setting up SCRCPY
How to use SCRCPY to Display and control your Android device on Windows
To start the process, you will first have to enable Developer Options on your Android device. If you are unfamiliar with this process, you can follow the steps shown below. The process is similar on most Android devices but if you are having trouble getting it working on yours, search for the process for your specific Android version.
- First, go to Settings on your device.
- Then scroll down and tap on About Phone.
- Next, scroll down and find Software information inside this menu tap the Build Number entry seven times.
- This will trigger a prompt telling you that "You are now a developer!"
- Some devices may ask you to enter your passcode. Some might not.

Now that you have Developer Options enabled, you will need to enable USB Debugging.
- To do this go to Settings > Developer Options.
- Inside the Developer Options menu scroll down and make sure USB Debugging is Enabled.
- Accept the confirmation prompt that appears.
Once you have done we can start the next part of the process which is setting up SCRCPY

Once you have done we can start the next part of the process which is setting up SCRCPY
Now that your Phone is Prepared, Download SCRCPY
Now that you have everything set up and ready, you can start the main setup process. First, visit the SCRCPY GitHub page and download the latest version of SCRCPY.

- Now that you have SCRCPY downloaded, extract it into your desired location.
- Next, make sure that you have your Android device connected to your PC using a cable that allows file sharing.
-
Note: Charge-only cables do not work. If you can’t transfer files between your devices you won’t be able to use SCRCPY. Also, some Chinese phone brands have extra options you may need to enable in Developer Options to get full keyboard and mouse control. For Xiaomi devices, you have to go to developer options and allow granting permissions and simulating input via USB. It will ask 3 times if you are sure.
- Next, go to the SCRCPY folder on your computer and double-click on the scrcpy.exe file.

- This will open a command window and SCRCPY will run through its setup process. You will see a prompt on your phone asking about developer options and if you want to allow access. Accept this prompt and SCRCPY will close.

- Now double-click the scrcpy.exe again and it will open, run through a connection process and your Android device will pop up on the screen.
That’s all there is to it, everything is set up and working! However, you are going to want to check out the next part of this guide which shows you a ton of extra tips and tricks you need to take advantage of.

Forwarding Audio in SCRCPY
Depending on the version of Android you are using SCRCPY won't forward audio to your computer. From Android 10 and up and SCRCPY version 2.0 and up audio forwarding is enabled by default. However, for Android 9.0 and older you will need to use SNDCPY to forward audio from your Android device to Windows. The two guides below will show you the steps you need to follow.
How to set up SNDCPY to forward audio from Android to PC
How to fix SNDCPY waiting for connection
Fixing SCRCPY Audio Problems
If you are having audio issues with SCRCPY 2.0 and newer with Android 11 or newer check out the following guides.
How to fix SCRCPY ERROR: Could not open audio device: WASAPI can't initialize audio client: Element not found
How to Fix SCRCPY Error ALSA: Couldn’t open audio device: Host is down
SCRCPY Troubleshooting Guides
If you have followed everything in this article but are having some issues with making sure devices are connected, otg mode, adb server, or computer keyboard and mouse connections these guides will help.
How to enable USB Debugging in SCRCPY with a broken screen
How to fix can’t control SCRCPY with keyboard and mouse
All SCRCPY Troubleshooting Guides
What is SCRCPY?
There are dozens of different ways you can connect Android devices to Windows PCs to take control of them. In the past, to get this kind of access and functionality, you first had to install third-party apps and deal with adb. Some older methods also require your mobile device to be rooted. Thankfully, that isn’t the case anymore with SCRCPY replacing all of those methods. Allowing you to easily display and control your Android. SCRCPY allows you to quickly and easily connect your phone to your computer and take control of it with only a few minutes of setup required.
The best part is that it is entirely free, and will allow you to control the device fully. All you need is SCRCPY (screen mirroring software), your Android phone or tablet, a USB cable that allows file transfers and a Linux, macOS or Windows PC. The entire setup process is super easy and has been improved over the years so it’s a lot simpler than it once was. So let’s jump straight into it so you can start viewing and controlling your Android device straight from your computer.
