Table of Contents
Learn how to activate or deactivate real-time voice to text subtitles in Skype on Windows, Android and iOS. A brand new feature recently added to Skype that transcribes spoken content into real-time subtitles.

How to Get Snap Camera Working With Skype on Windows 10.
If you are a regular user of Skype, you will be happy to know that the platform now has the ability to transcribe spoken audio content from standard calls and video calls into text subtitles. The feature is brand new and is already proving to be a very popular and useful new addition to Skype.
Subtitles give us the ability to communicate with people who may have hearing impairments or disabilities. If you use Skype to keep in touch with your grandparents, you’ll understand the value of the feature. Once activated, everything that is spoken within a Skype conversation will be transcribed into text on the screen, allowing you to listen to and read the current conversation.
If you have used Subtitles on YouTube, these work in a similar fashion, however, are far more accurate and are generated in real time. To kick off the feature, subtitles will flow at the same speed as the conversation, however, future versions are expected to allow users to scroll through subtitles in a unique side window, similar to a chat box or message window. If you’d like to start using real-time subtitles on Skype continue with the instructions shown below.
Related: How to Disable Suggested Responses From Cortana in Skype.
How Do You Turn On Subtitles For Skype Calls on Windows?
To begin, open Skype into the main window, then click the 3 small dots to the right of your username in the top left-hand corner. From this drop-down menu click Settings.

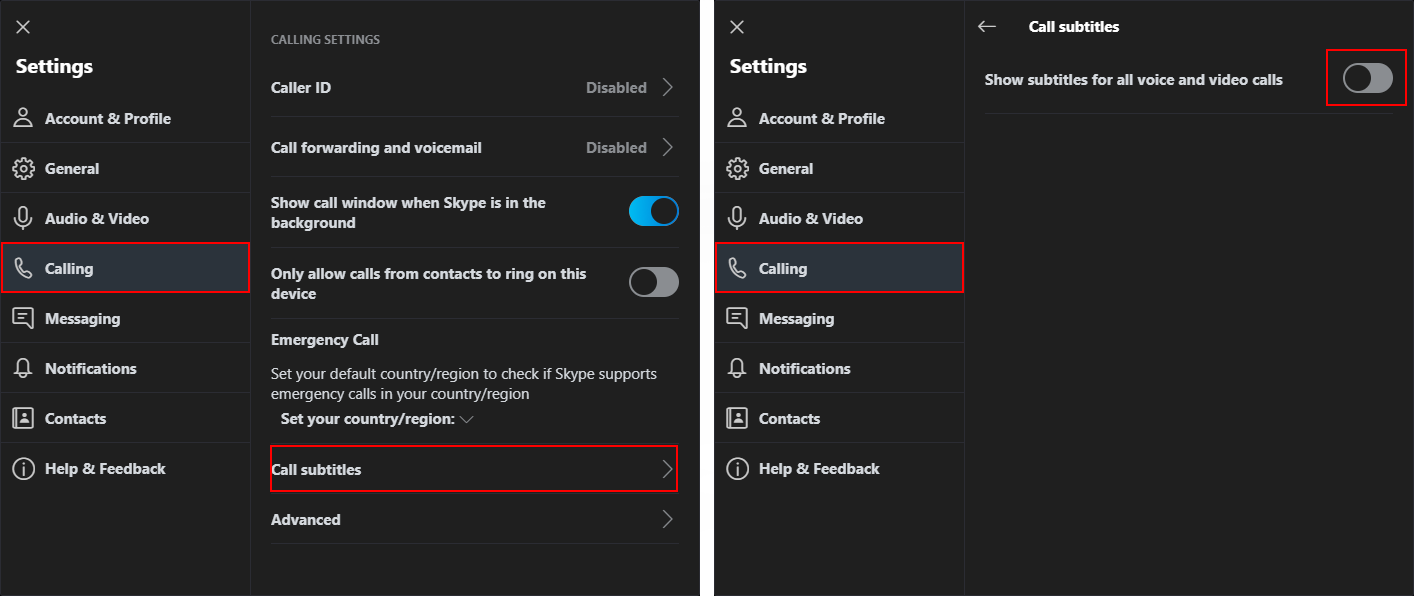
In the new window that appears, change to the Calls tab in the left-hand pane and click Call Subtitles near the bottom of the page. Finally flip the toggle next to Show subtitles for all voice and video calls to On. Once enabled, subtitles will be activated for any and all Skype voice or video calls.

Alternatively, if you don’t want subtitles enabled for all calls, you can enable them from within the active call. To do this, click More (the + icon) in the lower right section of the interface and select to enable them. Once the call ends subtitles will be disabled for all new conversations.
How Do You Turn On Subtitles For Skype Calls on Android and iOS?
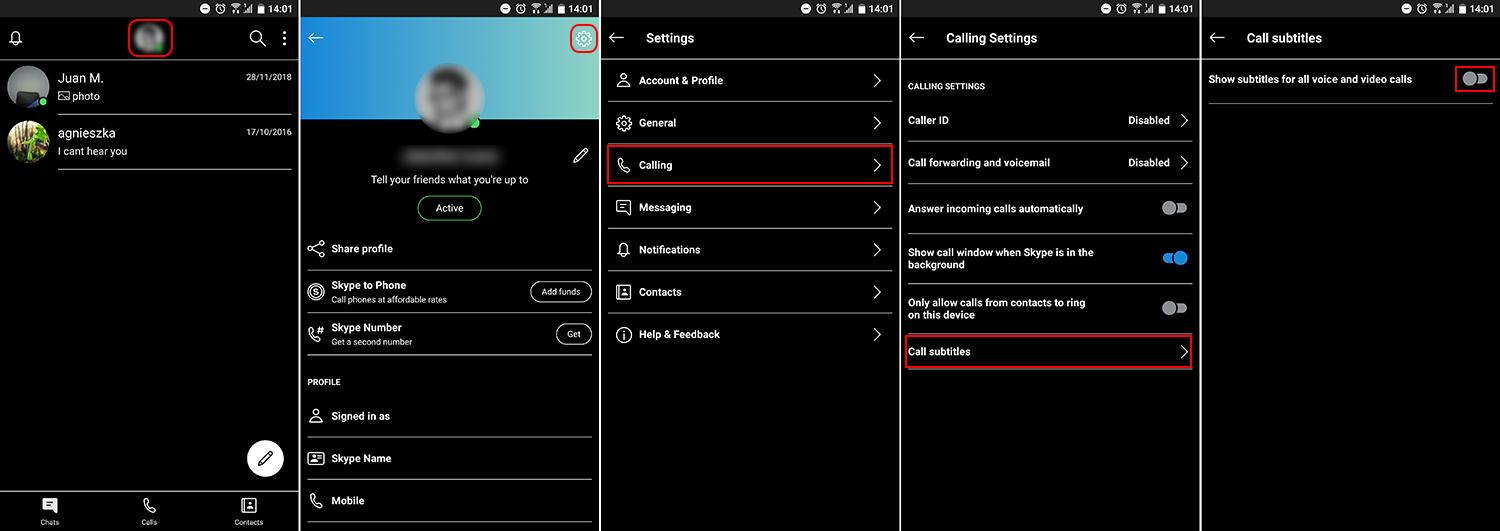
On Skype mobile open the app, tap your Profile Picture, then tap the Settings icon in the top right-hand corner. This will take you to the main settings page, here tap Calling, then tap Call Subtitles and flip then toggle to On. As with the PC version of Skype, this will enable subtitles for all Skype calls.

Alternatively, if you only want to enable subtitles in Skype for the current call tap the More icon (+) in the bottom right-hand corner of the chat window and select Activate Subtitles. As soon as the voice or video call has ended subtitles will be disabled once again.
.
.
