Table of Contents
If for some reason you wish to or need to run more than one Microsoft Teams account from the same computer. This article will show you how to get more than one Microsoft Teams account running at the same time on Windows 10.

How to Access the New Windows 10 File Explorer.
Microsoft Teams is currently one of the worlds most in-demand services, allowing businesses, educational institutes, and individuals around the globe to communicate and work together safely across great distances. It’s quick to install, intuitive to use and has way more useful features than Skype and a few other competitors on the market. Best of all its completely free.
Just like most programs and apps though, Microsoft Teams has been designed to only run a single instance from a single computer. That said, it isn’t impossible to force Microsoft Teams to run a second account from the same computer. Although it isn’t the most simple process getting around, it is possible and can be handy if you need to run two accounts from a single Windows 10 PC.
Note: If you want to take the easy path to run two Microsoft Team accounts from a single computer, it is possible to run an instance of Microsoft Teams from a web browser and another from the app.
How Do You Run Multiple Instances of Microsoft Teams on Windows 10?
If you haven’t already clued on, running multiple instances of Microsoft Edge on Windows 10 by default and without any tool isn’t something that can be done. Instead, you will need to head on over to GitHub and grab Multi MS Teams. With this tool, you’ll be able to use multiple Microsoft teams accounts simultaneously one instance per account.
Prerequisites
Before you jump straight into the process you’ll first need to be aware and organise to have the following component setup/installed on your computer.
.NET Core (download the latest version of .NET Core Runtime or Desktop Runtime for Windows)
Once you have .Net Core sorted, make sure you have also downloaded Multi MS Teams from GitHub. Just make sure you get the right architecture (x64 or x86) for your system.
Now that you have everything you need Launch the Microsoft Teams app, then open Settings from within the app. Stay on the General tab and uncheck the Auto-start Application checkbox.
Configuring Multiple Instances of Microsoft Teams to Run From a Single Windows PC.
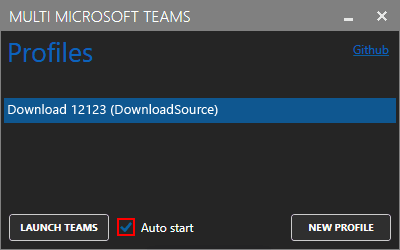
With everything set up, launch the Mutil MS Teams client and you will see a small window appear with 3 main options Launch Teams, Autostart, and New Profile. Click New Profile, then enter a name for the profile. Once you have completed that step, select the profile and click Launch Teams. This will open another instance of the Microsoft Teams app with a clean login screen. The app starts fresh a login screen every time you do this.

After setting up the first account, go back to the Multi MS Teams tool, select New Profile, to create another profile. Create another name (keep them easily distinguishable from each other) then, select the newly added profile and click Launch Teams. Another working instance of Microsoft Teams will open.
You can do this as many times as you like, however, any more than 3 or 4 will probably be starting to get pointless. In future, whenever you wish to start Microsoft Teams (in multiple instances) use the Multi MS Teams client and click on the profile you wish to use. Alternatively, if you wish to start all the configured Microsoft Teams accounts at system boot you can configure it from the Multi MS Teams options area. When enabled, it will automatically start all the configured accounts in separate instances.

On a Side Note…
If you also happen to be using the new version of Microsoft Edge that runs on the Chromium engine. Make sure you check out the following guide, which will show you how to turn on a new feature called Link Doctor. With Link Doctor enabled in Microsoft Edge, you’ll get quick and subtle autocorrect for typos entered into the address bar. For example, correcting ‘Bimg’ to ‘Bing’.
How to Enable Link Doctor in Microsoft Edge. (Link & Search Correction Tool)
