If you are using Office and would like to hide the Office Online Quick Access section from File Explorer this article will show you how to do so. This will prevent all Office files from appearing in File Explorer entirely. A handy change if you are using a shared PC and don’t particularly want other users seeing your docs. Though any reason to hide the option is also a valid one.

Table of Contents
Related: Control Panel Programs and Features option opening Settings app.
Office is one of the best software suites on the markets, it’s reasonably priced, had more features than you’ll probably ever use and has flawless interconnectivity with Windows 10 and 11. Annoying (depending on how you see it) this interconnectivity also means that some of your online files will also appear in the Quick Access section of File Explorer. Thankfully these cloud-based files can be hidden from Quick access in File Explorer using a couple of different methods.
Option one requires you to make some changes within the Windows 11 Registry which is available on all versions of Windows 11. Before you start this process make sure you have created a System Restore point just in case you need to revert back to a working state if you make mistake. Option two uses the Windows Group Policy tool but is only available on Windows 11 Pro and higher versions. If you are using Windows 11 Home you won’t be able to use this method, unfortunately.
How do you hide Office.com Online Files from Quick Access in File Explorer on Windows 11? (Registry)
If you are using Windows 11 Home this will be the only option you can use. Although it is a little more work it still gets the job done.
- To begin press the Windows Key + R to open the Run tool.
- Next, type regedit in the Run window, then press Enter to launch Registry Editor. When it opens navigate to the following location using the left-hand pane.
HKEY_LOCAL_MACHINE\SOFTWARE\Policies\Microsoft\Windows\Explorer
Note: If you don’t see an Explorer right-click the Windows folder, select New > Key, and rename the new key Explorer.
- Now in the central pane, right-click anywhere and select New > 32-bit DWORD Value.
- Rename this new entry DisableGraphRecentItems.
- Finally, double click it and change its Value data from 0 to 1, then Restart your computer.

After you’ve made the change the files will no longer appear in the Quick Access section of File Explorer or the Recommended section of the Start Menu.
How do you hide Office.com Online Files from Quick Access in File Explorer on Windows 11? (Group Policy)
If you have access to Group Policy, you’ll probably find this option a lot easier than the Registry Editor. However, as we mentioned above it isn’t available on Windows 11 Home.
- First, press Windows Key + R to open the Run tool, then enter gpedit.msc into the text box and press Enter.
- Now navigate to Computer Configuration > Administrative Templates > Windows Components > File Explorer.
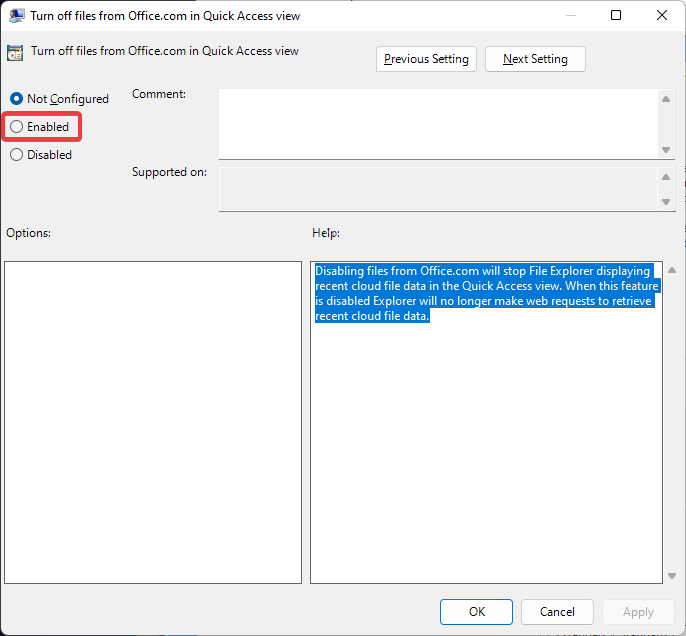
- Next on the right side of the window, double-click Turn off files from Office.com in Quick Access view.
- Set the rule to Enabled and click Ok to save the changes.

That’s all there is to it. You can change this back at any time simply return to the same location and change the rule back to Disabled.
