If you have just downloaded a game on Game Pass and launched it but noticed it doesn’t have any sound. This article will show you how to quickly and easily solve the problem with games from Game Pass having no sound after installation. A common Game Pass issue that can thankfully be solved easily.

Table of Contents
Related: How to fix Apex Legends Prediction error | Fix Apex Legends red lag icon.
Game Pass on PC is awesome when it is working properly and gives us access to a huge library of Games for next to nothing at all. Unfortunately, Game Pass isn’t working properly all that often, which makes using it frustrating and enraging sometimes. Between the Xbox app, Microsoft Store, and Gaming Services, Game Pass has a lot of working components that all come together to bring us this awesome service.
We’ve covered dozens and dozens of Game Pass issues to date all of which you can check out here and today we’ll be adding another article to the collection that deals with - “No sound in games after installing them using Game Pass.” This issue is the latest in a long line of Game Pass problems and seems to affect both Windows 10 and Windows 11 equally and is prevalent across all versions. The good news is that there are some simple fixes for no sound in Game Pass games after installation.
How do you fix no sound in games installed from Game Pass? No sound in Game Pass Games solution.
The first and quickest solution for this problem is to shut down your computer and leave it off for at least 30 seconds. Yes! That’s right shut your computer down entirely. For some reason, a simple system restart doesn’t solve this problem but a full shutdown does. Once your system boots up again you can open any game you’ve installed from Game Pass and it will be working correctly.
For most people, the above solution will solve the problem instantly, however, if you are still having problems after this there are still a couple of things you can do so work your way through the list below.
Repair or Reset the Microsoft Store, Xbox App, and Gaming Services.
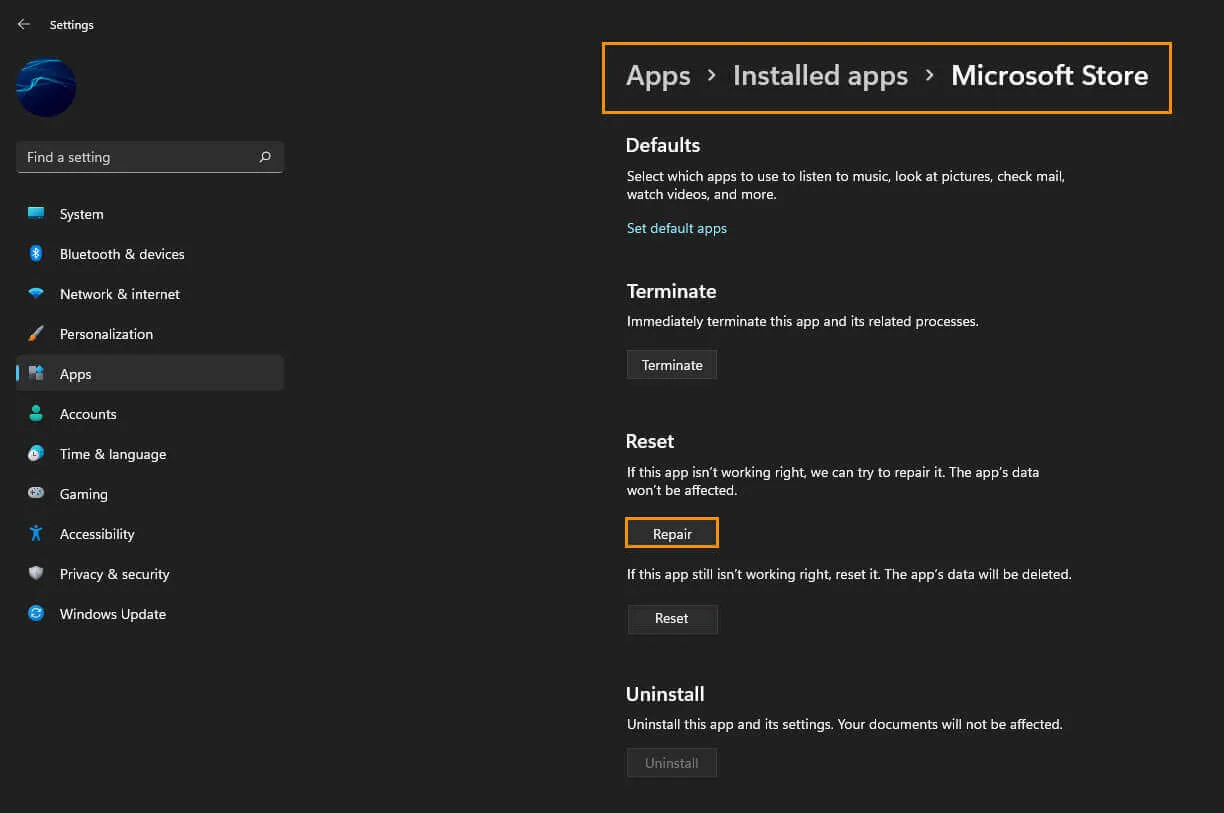
- To begin open Settings on your computer, then go to App > Installed Apps.
- Next, find the Microsoft Store app, then click the 3 dots next to it and select Advanced options.
- Now scroll down the list of options and click Repair. Let the process complete and check to see if the problem has been resolved.
- Repeat this process for the Xbox app, and Gaming Services app.

If this still doesn’t work, repeat the exact same process for all three apps, however, this time select Reset instead of Repair. Just be aware that you will have to reinstall all of your games and content again. This will reset all the apps to their clean installed state. But at least your games will actually be working.
Double-check that Windows is managing sound for the game correctly.
- If you are still having problems make sure the game you are having problems with is open.
- Now open the Settings app by pressing Windows Key + I and navigate to System > Sound > Advanced sound options.
- Here you will see everything that is using sound services on your computer. Now make sure that the game is using the correct Output device.

Download and install the latest update for Windows.
Check to see if there is a new Windows update to download. Perhaps Microsoft has addressed this issue in a new update. To force a manual update go to Settings > Windows update > Check for updates.
