Table of Contents
If you are using Windows 10 and have recently noticed that some of or all of your system folders and icons are showing up incorrectly, with a black background, this guide will show you how to fix these corrupted icon files. Restoring them back to their original clean state.

How to Mitigate Against Spectre and Meltdown on Google Devices and Google Services.
Of all places to find a bug or error, you probably weren’t expecting to find one as simple and annoying as the black background icon bug on Windows 10. Although it isn’t all that common, this error can happen at any time and can be caused by corrupted icon files, corrupted icon cache or missing Windows icon files. Thankfully, there are several relatively easy ways to fix the issue, so it won’t take long to get your system looking nice again.
Note: Before you begin the steps below, make sure your system is fully up to date, this is the quickest and easiest way to fix any system bugs. If your system is fully up to date, continue with the steps below.
Restore Folder Icon Default Settings to Fix Black Backgrounds on Folders.
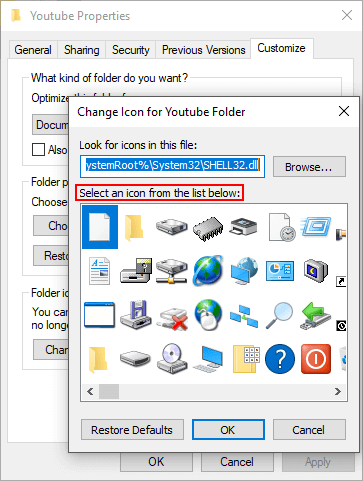
The first thing you can try in order to fix this issue is to restore the default icon. Even if you are still using the default icon, this simple reset can often fix the issue. To begin, right-click on the icon that is bugged, select Properties, then change to the Customize tab. Once you are on the customize tab, click Change Icon and change the icon to any random icon on the list and save the change.

Once you have done that, close all the open windows, until you only have the Desktop running, then go back to the exact same location and click Restore Defaults.

Remove Read-only Settings to Fix Black Backgrounds on Folders.
The next thing you can try to remove black backgrounds from folders on Windows 10 is to remove the read-only tick from the folder properties section. To do this, go to the bugged out folder, right-click on it then select Properties. If there is a tick or mark in the Read-only box, remove it then save the changes.

Delete the Thumbnail Cache to Remove Black Folder Backgrounds on Windows 10.
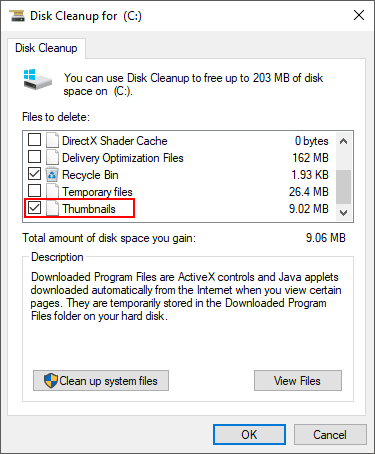
If both of the above solutions failed to fix the issue of black folder backgrounds, you will need to clear the Thumbnail Cache. To do this, make sure you have no programs or folders open then, press Windows Key + R to open the Run tool, then type: cleanmgr.exe into the text box and press Enter. (you can also find the option by searching Disk Cleanup from the start menu) When the tool opens, choose your drive, then scroll to the very bottom of the tool and make sure the Thumbnails box is ticked. Now all you need to do is click Ok and the tool will take care of the rest.

Run the System File Checker Tool to Fix Folders Stuck With Black Backgrounds on Windows 10.
Another option you can try to fix this issue of black folder backgrounds on Windows is to Run the System File Checker tool. To run this scan, you will need to use Command Prompt, so search CMD from the start menu, when you see it on the list, right-click on it and select Run as Administrator. When you have the tool open, enter the following command and press Enter.
sfc /scannow
This command may take a fair amount of time to finish checking your system for errors, so be patient. When it finishes it will display information about any errors and if they were fixed.
Run a DISM scan to Fix Black Folder Backgrounds on Windows 10.
If none of the above has fixed the issue the final thing you can try is to run a DISM scan on your system. To run this scan, you will need to use Command Prompt, so search CMD from the start menu, when you see it on the list, right-click on it and select Run as Administrator. When you have the tool open, enter the following command.
DISM.exe /Online /Cleanup-image /Scanhealth

When this command finishes if it detects any problems run the next command to fix them.
DISM.exe /Online /Cleanup-image /Restorehealth

When this scan finishes, Restart your computer and check to see if the problem is gone. It if is congratulations, if it isn’t, you may need to restore your system to an earlier date, sometime prior to you first noticing the issue. To do this search Restore from the start menu select the first option that appears and follow the prompts.
