If you captured a ton of photos and want to put together a timelapse but aren't sure how to do it in Davinci Resolve. This article will show you how to quickly and easily create a Timelapse in Davinci Resolve in a few short steps. The process is super simple and Davinci Resolve has settings specifically for creating Timelaspses.

Takeaways:
- Learn how to create a timelapse from static images in DaVinci Resolve.
- How do you use Davinci Resolve to make a timelapse video out of photos?
Table of Contents
How to Create a Timelapse Video in Davinci Resolve
Before you import your images, you need to modify the default settings in Davinci Resolve. Otherwise, each image will have an extended duration, making your time-lapse appear choppy or sluggish.
-
Launch DaVinci Resolve and open your project.
-
Click on DaVinci Resolve in the top-left corner of the screen.
-
From the dropdown menu, select Preferences.
-
A new window will appear with different configuration options.
The core issue that prevents images from behaving like frames in a video is that DaVinci Resolve automatically assigns them a duration in seconds. To fix this, you need to change the duration setting from seconds to frames.
-
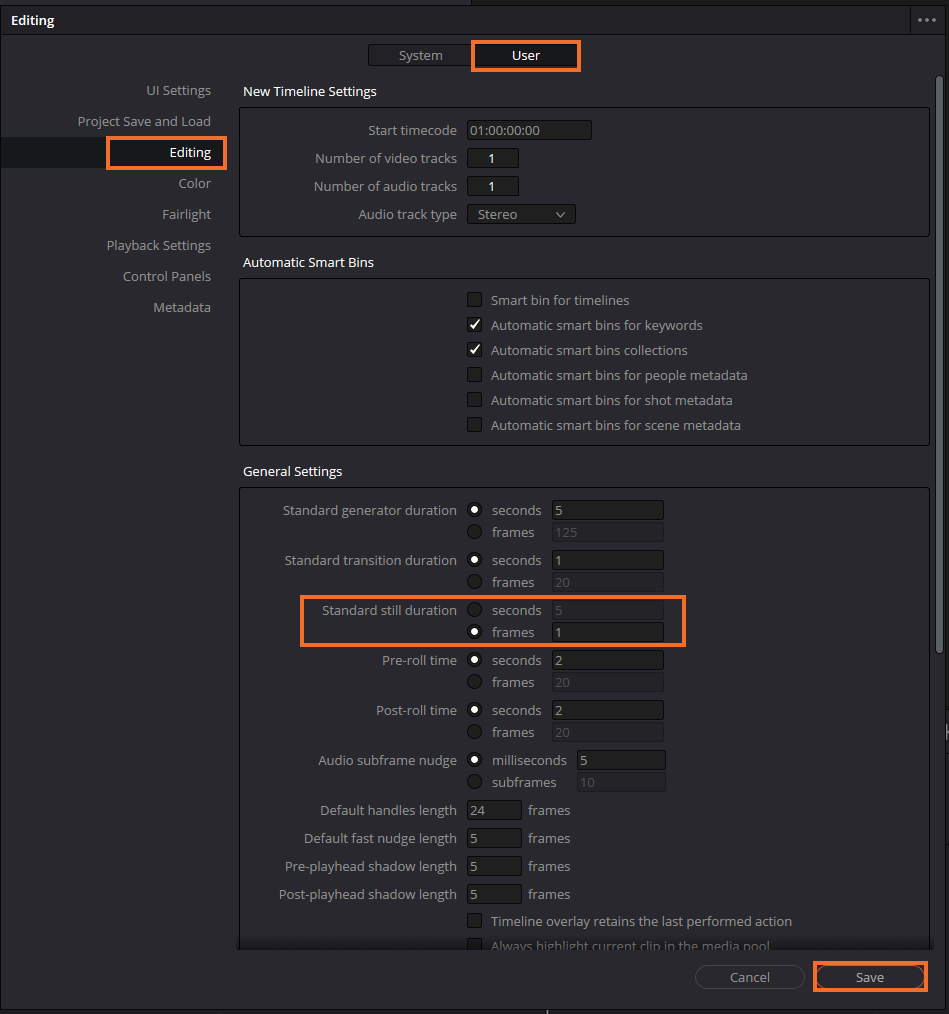
In the Preferences window, navigate to the User tab at the top.
-
Click on the Editing section from the left-hand menu.
-
Scroll down or use the search function to find the setting labelled Standard Still Duration.
-
By default, this value is set in seconds (often 5 seconds per image). Change this setting to frames instead.
-
Enter 1 frame as the new duration. This ensures that each image is treated as a single frame, creating a smooth time-lapse effect.
-
After setting the duration to 1 frame, click Save at the bottom right of the Preferences window.
-
Close the Preferences window to return to your project.
Now, DaVinci Resolve will apply this new duration setting to any images you import moving forward.
Import Your Image Sequence
-
Open the Media Pool in the Edit or Cut workspace.
-
Navigate to the folder where your time-lapse images are stored.
-
Select all the images you want to use (you can do this by pressing Ctrl + A on Windows or Cmd + A on Mac).
-
Drag the selected images into the Media Pool.
-
Next, drag them onto the Timeline.
Since we previously set the standard still duration to 1 frame, each image will now last for exactly one frame. When played back, they will appear as a smooth sequence, creating the desired time-lapse effect.
Adjust Frame Rate for Smooth Playback (Optional)
Most time-lapse videos are created at either 24fps (frames per second), 30fps, or 60fps. The frame rate you choose will impact the speed and smoothness of your final video.
-
Click on File > Project Settings or press Shift + 9 to open the settings panel.
-
Under the Master Settings tab, locate Timeline Frame Rate.
-
Select your preferred frame rate (24fps for a cinematic look, 30fps for standard motion, or 60fps for ultra-smooth playback).
-
Click Save to apply the changes.
Preview and Export Your Time-Lapse
Now that your images are playing back correctly, it’s time to preview and export the final video.
-
Click on the Deliver tab at the bottom of the interface.
-
Choose your preferred export format (MP4 is commonly used for time-lapse videos).
-
Set the resolution and frame rate to match your project settings.
-
Click Add to Render Queue, then Start Render.
Once the rendering is complete, your time-lapse video is ready to share.